What is Hydraulic Arm?
Hydraulic machines are machinery and tools that use liquid fluid power to do simple work. Heavy equipment is a common example.
In this type of machine, hydraulic fluid is transmitted throughout the machine to various hydraulic motors and hydraulic cylinders and which becomes pressurized according to the resistance present. The fluid is controlled directly or automatically by control valves and distributed through hoses and tubes.
The popularity of hydraulic machinery is due to the very large amount of power that can be transferred through small tubes and flexible hoses, and the high power density and wide array of actuators that can make use of this power.

Lets see how to make this.
Materials Used:
1.Card board/wood
2.Syringes-->7-8
3.Pipe(saline pipe)
4.Plastic Clamps
5.Small screws and nuts
6.Wire(binding wire)
7.Water (as working fluid)
8.Safety Scissors
9.Tape
**No electronic components are used**
How to make it?
Step 1:

1.Take the card board pieces and cut them as shown in the figure.
Make sure that your card board is strong to bare the weight of water filled syringe.

2.Insert the small piece of card board in that holes as shown.

This is the final setup required to bare a syringe.
Step 2:

Take a small piece of card board and drill four holes as shown.

We made that in order to fix the syringe tightly and prevent from falling.
Step 3:
Mounting

This structure depends on arena.You can make according to your use.
Take care when dealing with the binding wire.
Now arrange it as follows

This step is important and should do with care


Check the length of your syringe and cut the card board accordingly


This is the main part of mechanism
Step 4:
Arm Mechanism:
1.Cut the pieces in shape of arm as shown

2.The gripper is designed to move just one piece. It was more simple.
The "finger" was pasted fixed and mobile was seated on a shaft made with a piece of wooden stick that had a piece of cardboard cut in a circle glued on top so as not to leave the place.
The "finger" was pasted fixed and mobile was seated on a shaft made with a piece of wooden stick that had a piece of cardboard cut in a circle glued on top so as not to leave the place.

Make holes in a proper way

Place a small wood stick in that hole to hold the arms.

Step 5:
Base Construction:
1.Cut the card board in the shape of hexagon for better movement as shown

2.Properly choose the place to make the holes according to your cardboard size.
3.Fit the base with screws and nuts as shown below.

The base was made from two pieces of cardboard in order to support arm and accommodate syringes in the same set.
The movable part has two holes:
- One in the center (to be able to rotate the base)
- The other end (to link the syringe and allow movement)
The syringe was attached to another piece of cardboard to keep the same level of mobile base.
After verifying the limits of movement, we fix the syringe with the clamps
Final look of base should be as follows:

Step 6:
Put all the parts together.
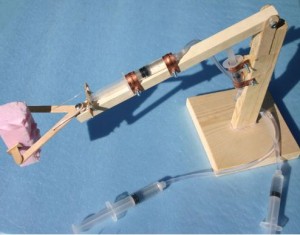
Here are some of the final pictures of the hydraulic arm.


Final Result:


Note:
This is the basic level of hydraulic arm.If you want to construct it with good quality of wood material
I would suggest you to click here
Also watch videos on youtube regarding hydraulic arm for better understanding.
Hope you liked this.
Come up with more innovative ideas:)
Thank you Guys
Have a great day:)
No comments:
Post a Comment